Monday, October 24, 2011

Bunting


It was my nephew's birthday last week and I wanted to create something fun for him that he could use over and over again.  I have seen buntings all over Pinterest, so I decided to whip out some sewing skills to make a fun happy birthday one!  I wanted it to be fun, colorful, and not too "cutesy" so my nephew would be able to enjoy it.  While shopping at an antique mall, I came across an awesome vendor that had all sorts of fabrics for sale.  They had a scraps of different patterns (I counted and there were about 40 kinds) all for $4.50.  I was excited; I thought I'd have to go to Hobby Lobby and buy 3 or 4 different fabrics to use (which would have worked, but not been nearly as fun).  So, here's a few pictures of what I got.  Seriously, I felt like I hit the jackpot!


Here they are all laid out on our full size guest bed.  
I had to overlap some of them because they wouldn't all fit! 
I could have made a quilt out of all of them.
(I actually only used about half of these, and had bought more.  
So, I'm going to give them to my quilt-making mom to let her work her magic!)


Here's a close up.  You can see that some are the same pattern, just a different color pallet.  
But they all worked together great!


Since my guess work of matching colors and patterns was already done, I just chose the ones I like best for my banner.  I tried to pick non-flowery ones too, since this was for my nephew and all :)  Ok, so after choosing the fabric the first step was to create a pattern.  I used the following pattern and just made it as big as possible while still fitting on a regular sheet of paper (I copied the image into Word and just kept making it bigger).

From here

I didn't use the entire pattern above, just the one triangle which I cut out from computer paper first, then transferred onto tracing paper (woohoo for my drafting kit coming in handy!) and cut that out.  I used both of these pieces to make sure I could cut out two triangles from each piece of fabric.  If you have bigger pieces of fabric, you can come up with another way to get the most out of it.  Here's a picture so you can get an idea of what I'm talking about.


I wasn't worried about having all of the patterns being perfectly "straight, so I just went with wherever the pattern fit best.  Next up, I pinned the pattern onto the fabric and cut out my triangles (I did 4 pieces at a time once I got the hang of it).


Next up was sewing the triangles together.  You only want to sew the two long sides up (you'll sew up the top when you add the bias tape.  To do this, lay two triangles wrong-sides together and sew one side together.  To make this go more quickly, I just sewed them one right after another on one side, cut those apart, then sewed up the other side.  Here's a picture of them all attached after I have sewn one side of each triangle. 


After this, snip all of the thread connecting the triangles so you can sew the other sides.  You can kind of see in these pictures that I used my fun patterns on one side and used a checked fabric for the back sides (since it won't be seen if it's hung up against something).  


 When I got to the end of one triangle, I back-stiched slightly, then got the next triangle right in there.  I tried to make my seam as close to the edge of my fabric as possible.


Here's a pile of triangles that formed behind my sewing machine as I went!  Just make sure to push them out of the way every now and then so they don't get sewn onto one another (I think I did that at least once...)


Up next, I cut as much excess fabric from the seams as I could and turned the triangles inside out.  Use a pen/pencil/screwdriver to get the point nice and pointy (what else?) because once you sew up the top, it;ll be pretty much impossible to do.  After you do this, you'll have some puffy triangles.  So, iron them out to get them nice and flat so they'll be easier to sew!

Before ironing

After

I had to fold in half and iron my bias tape.


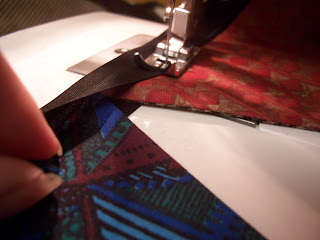
 Next up, I placed my triangle inside the bias tape and sewed it up.  All I did was try to get them lined up with the previous one as much as possible.  In other words, I just winged this part and tried to make it as even as possible!


Here's a better picture with how close I tried to get the corners of the triangles.  
I wanted them to be just touching so the spacing would be consistent.


Sewing done, I decided to sponge paint on the letters.  I could have appliqued it, but this was an easier solution for me that I thought turned out well.  I just placed the letters as low as possible on the triangles so that every letter would fit.  To do this, take your widest letter and then put a piece of paper/cardstock at the top of the triangle to measure how far down each letter should go (See the yellow-y/brown piece of paper above my stencil?  That's what I used as my guide).


I just used some white acrylic paint; lightly pressed my brush into it; dotted of the excess, then lightly dabbed the paint on my bunting.

***NOTE: If I do this again (which I plan to for my other nephew), I would probably paint before finishing of the top so I could place a piece of paper in between the two pieces of fabric because on a few of them the paint bled through the back.


Now, all you have to do is wait for the paint to dry, and you're done!  Here's my finished product displayed at the party!  It was so much better than just going out and buying a plastic banner from a party store!


Wednesday, October 12, 2011

Pinterest

So, as if facebook, this blog, and yhl weren't enough to inspire me/take up my time, there is now pinterest.  I joined a few months ago and have already amassed a huge amount of pins and future projects on my DIY post.  It's so fun to get inspired though!  I have already made patriotic strawberries and watermelon drink dispensers, removable pillow covers, and a happy birthday bunting for my nephew (post to come soon!).  It's fun to get inspired by others!  I think I will tackle a DIY wreath next!  Is pinterest anyone else go to place now when you are searching for ideas?

You can follow me here.


Originally from here

Originally from here


Originally from here


Originally from here

Squash Casserole


Squash, not the squash my husband likes to play with the crazy courts and rackets, but the kind that comes in about every shape possible.  When I was younger, I don't think I gave squash much of a chance.  Of course I liked pumpkin pie, pumpkin bread, and I even liked brown sugared acorn squash (who wouldn't?).  *Pumpkin is considered a squash, right?  I don't care if it isn't, it's squash-like enough for me*  But, beyond that I was a squash-hater.  Zucchini bread = plain weird in my book.  So, when my mother-in-law made up some squash casserole, I was skeptical.  Especially since it incorporated stuffing, another non-fave from childhood.  Well, I was pleasantly surprised.   Squash + stuffing + butter = love!  So, here's how I make it.

You will need:
Squash, peeled (I tend to use one zucchini and one yellow squash)
Onion
Carrots (I have used regular peeled and diced carrots, or baby carrots - yes, I can be lazy).
Cream of chicken soup
Sour Cream
Salt and Pepper
1 box stuffing mix (or you can get fancy and make your own)
1/2 cup butter or margarine


1) Start boiling a large pot of water.

2) Peel squash


2a) You can probably start pre-heating your oven now to 350 degrees.


3) Cut up carrots, squash, and onion, they don't have to be tiny, but cut them down enough that they will cook through.

3) Add vegetables to boiling water.  Boil for at least 5 minutes (I start by adding the carrots, then add in the squash and onion as I get the cut)

4) Drain water from the vegetables.


5) Add in 1 cup sour cream and cream of chicken soup.  When I was short on sour cream, I added a little bit of cream cheese which worked well.  For this batch, I added a little bit of Philly Garlic cooking creme, but I really don't think it added anything, so just skip it. 


6) Add a dash of salt and pepper to taste.


7) In a separate bowl, melt butter and toss with stuffing.


7) Spread 1/2 of stuffing mixture on the bottom of a 9x13 pan.

8) Cover stuffing mixture with squash mixture.


9) Spread/sprinkle the rest of the stuffing mixture on top.


10) Bake in oven for 30 minutes at 350 degrees.


11) Remove, cool, and enjoy!


***This is so good on its own, or served as a side dish.  Great for holiday get-togethers!

Thursday, October 6, 2011

New Bedding!

It is so windy out today I feel like the house is going to blow down!  I would love to should go outside and spray paint numbers onto the galvanized steel buckets and the milk pail I thrifted recently, but I fear I would end up with more paint on me or the house than anything else!  Oh well, maybe next week once the front moves through!  I really shouldn't complain about the wind though, I so missed it when we were living in South Carolina!  They thought 20mph winds were crazy; we have gust over 40mph right now and it's not too bad!  Ok, anyways, onto the bedding.

I shared a picture of my bedroom recently here, and if you saw it you probably noticed the lack of a bedspread/quilt/duvet/anything other than a few blankets on the bed!  Well, since we are hot-natured and it was the summer time, that was about all we needed on any particular night.  I have been toying with the idea of buying a duvet cover and a down duvet for awhile now.  I found some really reasonable prices for down duvets on Overstock.com and I fell in love with a duvet cover from Urban Outfitters, but for at least $150 total, I just couldn't justify it.  I know, bedding is important (you spend 1/3 of your day there!) and maybe I'm just cheap, but I couldn't fork it over.  So, I compromised.

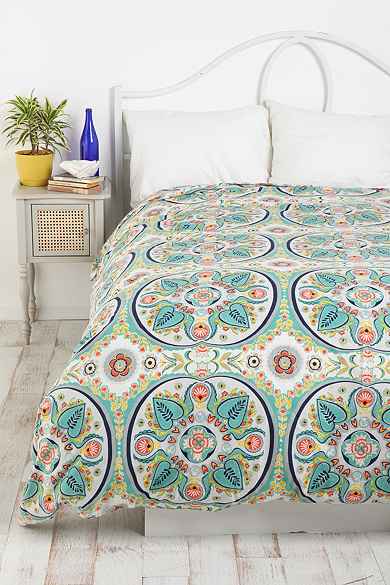
Here's the duvet cover that I fell in love with:

Nevermind, they apparently don't
even have the yellow one anymore
because it was just that cool.

So, I realize the yellow wouldn't be the best math with our green chairs, but the blue version was almost as fun and had all of the colors I was looking for: blue, yellow, green, coral.


Isn't it so pretty?  Ok, so at $109 for a king size it was just too pricey.  We have a queen bed, but I thought a king size would help with cover stealing issues!  Well, luckily for me I was out estate-saling and clearance-rack-perusing and I came up with an alternative.  You know I love a good bargain.  First, I stopped at a gorgeous estate sale where there were amazing antique chairs and painting and rugs and and....  It was just such a fun house, but soooo pricey!  I ended up getting a few things including this tablecloth.  Yes, I realize a table cloth is not bedding, but it had a fun pattern and great colors and I loved it!  

But, you don't get to see it quite yet because that would ruin the surprise.  Ok, so after that fun excursion, I headed to Target and found a huge selection of bedding for 75% off!  Woohoo!  That stuff gets me EXCITED!  So, I picked up a few things (1 quilt, 1 duvet cover, 1 coverlet, 1 sheet set, about 5 throw pillows, 6 small area rugs, and I think that's it).  Ok, I knew I was going to return whatever didn't work, so I overbought things since I wanted to see how a few options looked in the house. 

Here are the quilt ($25) and duvet cover ($17.50).  I got.  I apparently forgot to take a picture of the coverlet.


I was afraid the quilt might be a little too girly for my husband, but since he liked my Urban Outfitters selection, I figured I was ok.  As for the duvet cover, I did not want the bland beige look, but thought it could be fun to dye it a nice blue tone since it was 100% cotton.  So, up next was a test run on the bed.  First up, the quilt.

I liked how calming it looked on the bed, but wanted to go through all of my options.  I didn't get the duvet cover out because the more I thought about it, the more I figured a solid duvet cover would be hard to keep wrinkle free (I am not a huge iron-er!) so, I just skipped that.  You can get an idea of how it would have looked from this old picture with just our sheets (or you might have seen it while I was rearranging furniture, here), which are nearly the same color, even though I would have dyed the duvet cover.

Forgive the mess!  It was cold the night before, so I have quite the assortment of blankets out!
Up next was the coverlet.  And, here is your first glance at the estate sale tablecloth I mentioned.

This one looked ok, but I was not sold.  I didn't totally love the stripes, and when I got under it, it was just too hot (the filling was polyester, so it didn't breathe well).  And, it didn't work very well with my new tablecloth end-of-the-bed-throw.


Even though the coverlet was a king size and the quilt was just a full/queen, the quilt won out.  It blended in so nicely with the tablecloth, which in turn blended in great with my velvet green chairs on the other side of the room.


Now, I kept trying different pillow arrangements trying to get that magazine spread look, but it's harder than it seems!  I didn't like the dark blue, so I took that out.  And got the following:


 Then I thought the pink wasn't totally working so I took that out and ended up with this:


And I like it!  I made those small pillow covers myself and I think they pull everything together including the quilt, tablecloth, and green velvet chairs (their usual home).  Now, to figure out what to do with those curtains.  Up next, the sheet set I bought.  Since upgrading to a queen size mattress, we haven't had a spare sheet set, so I got these on sale at Target (on top of a 20% off coupon), for about $40.  I bought a higher thread count sheet set from Target previously and we fell in love with the softness compared to those cheapy Walmart sheets and I figured 20 bucks off was a pretty good deal for the set.  I wanted something to go with the quilt, but not match outright, so I went with a damask sheet set.  Here they are with one of my pillows and the tablecloth on top of the quilt so you can get and idea of how they go together.  I'm liking it.


Next up, an awesome rug that I had been looking at every time I passed the Target rug aisle.  It was smaller than the one I wanted, but since it was 75% off, I thought I would at least give it a try to see if it worked in the room.  Sadly, it didn't.  :(  Oh well, I brought it back to Target so someone else can enjoy it.  It was just too dark/rust colored to go with the pinky coral I had going on.


Here's a close up so you can see that, though beautiful, it really doesn't work at all.


I even tried it down in our basement, but it still didn't quite work.


So, back to Target it went.  Now, I've got the bedding down, but I'm still working on a paint color for our bedroom.  I had originally wanted a grey, but now that the quilt is on our bed, I'm not sure it works.  I had originally chosen the colors because they went with our natural wood trim, specifically the bottom right color was the front runner (Pebble by Glidden).  But, now it just seems like its too close to the bedspread color and just isn't working.  I'm thinking maybe one of the darker grays on the top right paint card (third from bottom) but I'm afraid it will be too dark!  I should probably just get a sample, slap it on the walls and see, the worst that can happen is I hate it and have to paint over it, right?  Or maybe I'll just paint a huge canvas in that color and move it around to see what it looks like in different parts of the room (a tip I learned from www.mariakillam.com I believe, she has some great insights on color!).  Well, at least the room is evolving, even if it is ever so slowly!  Anyone out there jumping on the grey bandwagon?  So far, I've just spray painted a few accessories the "trendy" color.  Ok, now enough procrastinating.  I'm off to finish my online accounting class videos for the week!