Sunday, August 28, 2011

Composting

Even though our garden is fairly well done now (well, it was done about a month ago after weeks of 100+ degree weather), we are planning for next year by working on a compost pile.

The garden went from this (above) to...
***The owl is there to scare away squirrels/rabbits, they were nibbling on things***

 ...this and got progressively worse and more brown.

The compost has been a pretty simple process so far.  First I went out and bought two large plastic bin at Lowe's (or Home Depot, can't quite remember which at the moment).  I bought two so once one is filled up, we can let it do its thing and keep adding to the second bin.


Next we drilled about seven holes, 1/4 of an inch each into the lid and the bottom of the tote.  Then it was time to start adding stuff.  You are supposed to start out with about 1/2 to "browns," some soil, and then add "greens" in as you go.  Browns include things that you generally associate with being brown, dried leaves, dead grass, and even shredded paper.  Greens include old fruit/veggies and their leftovers (rinds, etc.).  Since it was the middle of summer, I didn't have access to many dried leaves, so I chose to shred up some newspaper.


The instructions I followed said to fill the container with 1/3 of the shreddings, so I got to work.  My printer had a little trouble with all the newspaper, so I had to keep making sure it wasn't getting plugged up, but I got it to work well enough to get a good pile going.

It was much less messy to have the shredder in the bin while working so the little slips didn't go everywhere!
If you have access to leaves, that would probably be a more favorable option, but I used what I had!  Next, I took the bin outside and added a bag of soil (you could just dig up some soil from your yard too).  That smushed all of the newspaper down and barely filled 1/3 of the container.  So, I added another bag of soil on top of that.  Next, it was time to add some rotten fruit.  I have been adding whatever we have about once a week.  To keep the fruit flies at bay, I just keep a small bag with all the soon to be composted items in the fridge.

Yum!

The only thing to do after that is stir things up a bit, keep adding, and wait.  I haven't noticed any crazy smells coming from there, but there have been a few small bugs (most of which ) and a little mold.  I believe the bugs and mold are just part of the composting process.  When there is a lot of mold (which I think is caused by too much moisture) I have added more browns to balance things out a bit; we have some random bags of cotton that didn't get used for their original purpose that I've been throwing in.  Everything seems to be working for now!  Hopefully we'll be able to use it next year for our garden, and hopefully next year all of our plants won't all wilt because of abnormal heat and extremely small amounts of rain!

You can find a good list of items to compost here.  Careful with anything dairy though, I've heard mixed things about adding it.

Tuesday, August 16, 2011

Lamp Revived

In the same thrift shop I got my picture frames, I ended up buying an old lamp and lampshade.  They weren't looking too good, but for $10 total, I thought I could make something happen.  Here's the before.


I really liked the shape of the base and could see it being so nice bright and white.  And all the shade needed was a little brightening up.  I chose this fun flowery fabric for it.


I believe it is from Waverly's Sun 'n' Shade.  Isn't it just so happy?


The first thing I did was tear off the old fabric from the shade.  This involved slight gagging as dust and dried paint particles flew.


The next thing I did was spray paint the base white.  It was no simple task.  Well, maybe it was simple, but it took forever!  The first 5 coats seemed like they were hardly covering anything!  Good thing it was hot and dry outside so things dried quickly, allowing me to do coats within minutes of each other (I had about 10 things I was spray painting, so I just went around in circles and once I got to the beginning, things were ready for a second coat).  I forgot to take an after picture of just the base, so you'll have to get to the bottom of the post before you can see it.  The only bad thing was I think some dirt was  flying around in the air and got stuck on the lamp base because there are little bumps on certain places.  I could try sanding it down, but so far it really hasn't bothered me.

Ok, next step was to cover the shade with my new fabric.  I laid out the old covering on top of my new fabric (and also rolled the lamp shade across the new fabric since the old covering was stretched a bit when it was on the shade) to make sure I cute out enough fabric to cover the shade completely.  It was a little tricky because the shade wasn't perfectly cylindrical, so I just cut it extra wide.  This is what I ended up with.


I took the fabric outside and used some of Elmer's craft bond to get the fabric to stick.  I did the outside first, then trimmed down the fabric and glued a small bit of fabric over the edge.


Next up all I had to do was put the lamp together and plug it in.  Here are a few pictures of it against the paint color in the office (the rest of the room was a mess at the time, so I don't have a picture of it in its final resting place).


I put the ball of string in so you'd have an idea of the size of the lamp.  It's pretty tall!


Look at those hyperbolas being cast on the wall!


Monday, August 15, 2011

Banana Muffins

I love buying old bananas and making banana bread (especially when you get them for 15 cents a pound!).  Or using forgotten brown bananas to make something delicious.  I used the following recipe from our church's old cookbook.  And yes, usually my cookbooks end up with a little egg, butter, and flour stuck on them somewhere.  It gives them character.


Pretty simple recipe.  As for the sour milk, I sometimes put just regular milk in or don't put any at all and haven't noticed too much of a difference really.  I think buttermilk would be good, but I'm not going to buy it just for this recipe!  I also tend to add a tad more salt (like 1/8 tsp) because I think it brings out the flavor more.  I have found that using a potato masher is a really good way to mash up the bananas.  You want to make sure they are really well mashed, like the consistency of baby food I would say.

I made muffins tonight.  I fill the greased muffin tins from 1/2 to 3/4 full depending on how large I want the muffins to come out.  I have found that this recipe makes between 15-20 muffins depending on the size.  Also, for making muffins be sure to cut the baking time.  I put them in for about 15 minutes, then rotate and flip the pans to get even cooking and bake for another 10 minutes.

They should be slightly golden when you take them out, like this:


I made a double batch (I had 7 bananas), so I got 34 muffins.  The best thing is, these muffins get better the next day!  Just make sure to store them closed up.


I put them in a Tupperware cake container for storage.


I find the best way to enjoy them is with a bit of butter.  Yum!


Anyone else baking anything out there lately?

Picture Frames

I have always wanted to have a frame wall.  Well, maybe not always, but I really do like the idea.  So, I headed to the local thrift store to pick out some frames and came back with 8 frames for about $10.  Most of them had been stained and a few were painted and at least one was unfinished.


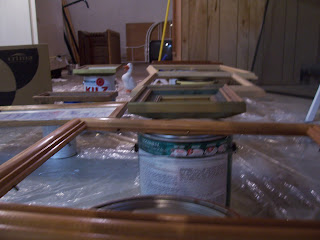
I layed them all out on various paint cans we had around.  I learned leaving things on a not so clean tarp in the basement is a good way to invite dirt onto your stuff when I was painting some shelves earlier this summer.


I just took which ever frame I was painting, painted all of it (well, not the back) except for the small place I had to hold on to it, then placed it back on its spot to cover that little spot and let it dry. 


I knew sanding them down and using some oil based primer would give me the best results, but I was feeling like experimenting (or maybe you can call it lazy).  Anyway, all I did was put on three thin coats of Benjamin Moore's Decorator's White in semi-gloss.  I have used this same gallon of paint for quite a few projects, like painting a door frame in the bathroom and turning old auction finds including a small dresser for my closet,  bookshelves, and microwave cart into crisp white storage for the office, and now these picture frames.  The great thing is I haven't even used a third of the paint!  I was worried when I bought it (it cost about $40), but since it has lasted so long already and done a great job with coverage, it was a good buy!  So, back to the frames.  I could tell all of them would need another coat after I applied the first one.  So, I let them dry over night and then added another coat.   Things were still looking iffy and I was wondering if my "experiment" was going to work out.  So, a few days later I decided to try one more coat.  Voila!  Nice crisp white frames.  I like that they are all different shapes and sizes, but are the same white to make them go together.

Now all I had to decide was where to hang them.  I had originally planned to hang them in the hallway leading to our bedroom, but we still have to paint up there and I didn't want to have to hang them, take them down to paint, then rehang them again.  When my husband said something about how I was probably annoyed one of the walls in our living room was bare, I knew that was the spot.  I laid out the frames on the floor first to see how I could arrange them.

At first, I liked the following arrangement best.  But as I got to thinking about it, I thought the mirror (the one in the top left corner) would be reflecting too much stuff if put in that placement since it would be opposite of out built in dining room hutch.


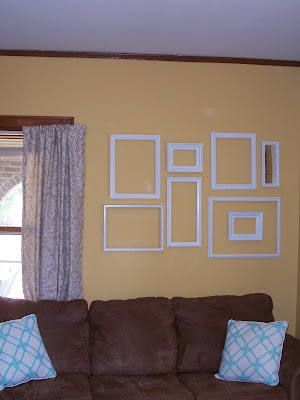
So, the next thing I did was make a mirror image of the frames, swapping the ones on the outsides.  Now I figured the mirror would just reflect the wall.


As for hanging all of the frames, I used picture hanging Command strips.  Since we have plaster walls, I am very leery of actually putting any nails through the wall because of the mess it takes to patch them.  We had to patch a bunch of places in our office after we took down the 4 layers of wallpaper, which we did by plastering the cracks and crevices, waiting for it to dry, then sealing off the room while my husband donned a heavy duty mask and sander to sand things down and make them smooth.  Not something we want to go through again!

I know a lot of people will take the time to cut out pieces of newspaper to the same dimensions of their frames and tape them up in order to make sure they like that placement, but since I started this project out with laziness experimenting, I figured I'd keep it up!  So, I measured out some string to the dimensions of the frames laying on the ground then taped that up to the wall as a sort of "guide."  Next, I taped up the string on the wall.I kind of wish I had moved it over to the left slightly, but I am going to try to get a few command hooks so I can hang the curtains up a little higher and wider (so the window frame doesn't show above them).  I think that will help balance things out.


The next task was to put up the strips.  What you do is put the strips on the frame first, place the frame where you want it, then lift up on the frame so that one part of the velcro-type fastener is stuck on the wall, while the other part is still on your frame.  In order to make things level, I just sort of balanced a leveler on top of my frame as I went.  You could probably draw a line with the leveler or try all other kinds of better ideas, but this project was all about experimenting!  Here's what it looked like after I had put all of the strips up.


I believe that little shiny spot is an attempt to cover a hole or missed spot while painting.  I have since learned it is best to add a little water to your paint before trying any touch-ups, and feathering the paint out so it's not so obvious.  Lesson learned.  Ok, so here's the big reveal.  The following two pictures capture our living and dining room paint color the most accurately.  I think it was called honey and it was Walmart Color place paint (NOT a brand I would recommend), but the color goes well with our wood trim, which my husband has made clear won't be painted.  Because of the age of the house, I really kind of like the natural wood trim.  It just makes decorating harder.


I can't tell you how much it is bugging me how the curtains are hung.  If only I had learned the "high and wide" principal before we my husband spent hours drilling into the very hard frames, we might have saved some frustration.  Hopefully I will get to them soon, but that's a project for another day.


Are you a fan of the empty frame look?  Or do you think it's totally weird (as did my husband before I put them up.  "Aren't you going to put anything in them??").  I think it turned out well!  The only thing I really want to change is to move the bottom left frame a few more inches away from the frame to the right of it.  Then this part of the wall should be done!

Thursday, August 4, 2011

Souffle success!

I decided to bake a souffle today, for lunch.  Not really the typical quick and easy lunch, but I just got some cute souffle dishes yesterday and wanted to try them out.

I have never made a souffle.  I've made many keishes, so I figured this wouldn't be all THAT different.  And in some ways it wasn't, eggs and flour, check.  Now, putting the whole thing together was where it got a little more fun.  I used this recipe by Alton Brown.  I quickly looked at the ingredients and realized I didn't have any parmesan or butter.  Usually I am a fan of going the cheap route in recipes and using margarine (I never have problems when I'm baking cookies), but that didn't seem like a good idea here.  I had milk, but it was skim milk and I didn't think that would work nearly as well.  So, I went to the store and bought some whole milk, butter, and parmesan.

When I got home and was looking at the recipe, I realized this would be a little bit more labor intensive than I had anticipated.  I buttered the dishes to discover there was no room in the freezer, so I just put them in the fridge until I was ready to pour in the mixture.  Next, I let the butter heat up while I gathered the flour and other dry ingredients.  I think this is also when I separated the eggs.  I included one mystery ingredient.  You see, when I had my wedding shower (4 years ago now...) my sister had us play this game where she had blacked out the names of spices and we had to guess what each bottle contained.  So, below is what I think MAY be powdered mustard, but since I lost the sheet my sister gave me, I have no way of knowing for sure...  woops.


Oh well, the butter was getting brown (I was worried it was getting too brown, but things seemed to work out), so I wisked in my flower mixture and let it sit for a while.  I don't think I waited a whole 2 minutes though, I was worried it was going to burn.  Next I wisked up the eggs and added them in, along with the milk (which I had heated up for 1.5 min in the microwave) and let the mixture heat up.  ***I just realized the recipe says to wisk the eggs into the milk, uh I didn't see that before so I just wisked the yolks directly into the mixture on the stove, and then added the milk.  *** So, next up was the egg whites.  I quickly looked for my hand mixer, but was unable to locate it (I tend to just use my wisk, spatula, hands, etc. when cooking).

Here's when I figured I could just wisk the egg whites up on my own.  After all, I had just watched Julie and Julia and Julia seemed to be able to do it just fine, right?  I wisked, and wisked, and wisked.  It seemed like nothing was happening for a good 3 minutes.  But then, I started to see something foamy!  This gave me hope.  So, I kept on going.  It really would have been helpful to be ambidextrous.  I used my left hand a few times, but it was like a disaster waiting to happen as I nearly sloshed out my hard-earned fluff from the bowl each time I tried.  Anyway, about 10 minutes later things were looking pretty good.  The eggs weren't "stiff" but, I could form a rounded peak from them.  I felt satisfied enough to continue.  So, I folded the egg whites into the mixture very carefully and poured it into the souffle dishes.  All I had to do was wait.  30 minutes.  I was so worried that things would be spilling out all over, I wouldn't get anything near to the puffed-up look I was aiming for, along with other fears.  So, when the timer went off I almost didn't want to look!  But, I grabbed my camera.  If they did fall later, at least I would have proof they were high and mighty at some point!  And, here are the results...


Don't they look so cute???  I was so glad they came out looking good!  The smell of cheese, garlic, and butter had filled my kitchen and I was excited to try it!  Of course, the first thing my husband did when I made him come look at them was poke one of them, of course making it fall, haha!  But, here is my proof that I didn't completely mess things up!  And they tasted yummy and fluffy!  Next up, chocolate souffle!


Have you had any recent success (or failures) in the kitchen?